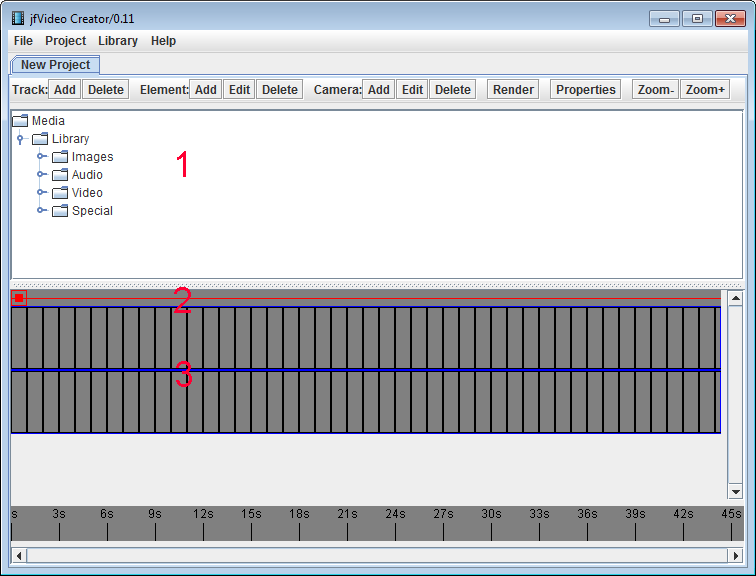
- 1 - Library : Where your media files are that can be added to the project.
- 2 - Camera : This camera timeline can be used to add key points to move the camera thru 3D space. Only videos/images that have a 3D position property are effected.
- 3 - Tracks : These are the tracks that contain video/audio/image elements to be merged into the final output.
Add tracks, then add elements (video/audio/images/special effects) to the tracks, and then render to merge the elements into one file.
To add a track, click on 'Add' next to Track: in the toolbar.
To add an element, click where on the track you want the element added and then select the element in the library and then click 'Add' next to Element: in the toolbar.
You can drag elements to reposition them once added.
The timeline where elements are placed on tracks is split up into seconds.
Once an element is added to a track you can click on it and then click 'Edit' next to Element: in the toolbar. A dialog box will popup with many different rendering options depending on what type of element it is.
Once you have your elements setup as desired you can render your project. Edit the project properties first to select desired output format and quality.
During the rendering process each track is rendered from top to bottom, frame by frame. This means that a track below another track will overlay the higher track, but the overlay could be semi-transparent, or positioned differently depending on its properties.
3D Space:
If any image/video elements have a 3D position property defined it will sit stationary in that position. The camera can move through space to key points added on the camera timeline. The camera will move in a linear line between key points.
To add a key point, click on the camera timeline where you wish to add a point and click 'Add' next to Camera: in the toolbar.
A key point is represented by a square on the timeline.
To edit the position of the camera at a key point, select the key point and click 'Edit' next to Camera: in the toolbar.
The position of the camera includes x/y/z rotation, 3D space position as well as fov (field of view).
Cut:
The Special Effect 'Cut' will prevent all frames it overlays from being rendered to the final output. Edit the cut element to specify how many seconds to cut. All tracks above and below the cut are discarded..
FAQ:
Q:Why is there no fade out?
A:There is a fade in but no fade out. Typically you would overlay each video element by 5 seconds and fade in each new element. If you need to fade out at the end, add a black image that has a duration of 5 seconds, place it under the last 5 seconds of the last video element and fade it in. This will make the video fade to black at the end.


